I am a backend developer from Belgium. My first language is C#. Mostly working on the .net tech stack. Powershell is the script language that I am most familiar with. I love automating stuff. Tools you work with should be tools that you like to work with :). Loving the devops scene as well. At the moment, my platform of choice is Azure, but looking at GitHub these days as well.
I do have some experience with typescript. but that is not my strongest suit.
Working with Rider and Resharper, so thanks Jetbrains for making great tools :)
Previously on
In one of my previous posts, I talked about my assignment. In summary, that assignment consists of making some REST API protected with an Oauth2 access token. During that assignment, the DevOps team rolled out a new way of deployment using IaC, which comes with a new branching strategy: an environment-based branch strategy.
Context
In this post, you will read about what I do to make sure I use the new branching strategy as intended. That new branching strategy is needed to enable the way they implemented IaC.
It is imperative to work with bugfix branches and feature branches. The code that is deployed to an environment, will be put on in the same repo but on a branch that is coupled to a development, test or production environment branch. You cannot work directly on the branch named master.
Each time a developer pushes his code on the master branch a new (unintended) deployment happens. To ensure this does not happen, use branch policies. You read more here.
However, in this stage, the DevOps team does not make any decisions about that. I should do what I can on my end.
Enter Git Hooks
Below I have copied information from the git-scm.com page. I did this for the reader. I hope this will enable everything the reader needs to know to understand the git pre-commit hook. The next source you want to visit is the following: Learn how to use pre-commit hooks, post-commit hooks, post-receive hooks, and more. | Matthew Hudson.
Needed theory to understand
Below I define two sections that are needed to understand the script I wrote: Git Pre-commit hook and the scripting language Bash.
Git Custom Scripts
Git has a way to fire off custom scripts when certain important actions occur. There are two groups of these hooks: client-side and server-side. Client-side hooks are triggered by operations such as committing and merging, while server-side hooks run on network operations such as receiving pushed commits. You can use these hooks for all sorts of reasons.
Installing a Hook
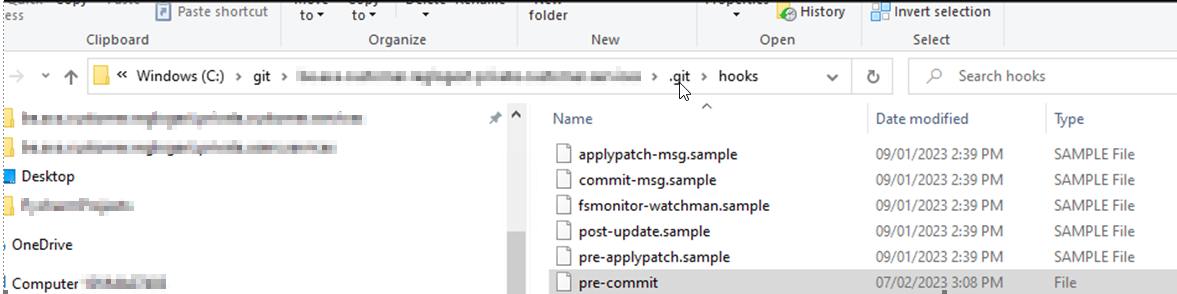
To enable a hook script, put a file in the
hookssubdirectory of your .git directory that is named appropriately (without any extension) and is executable. From that point forward, it should be called. We’ll cover most of the major hook filenames here.
Pre-Commit hook
The
pre-commithook is run first, before you even type in a commit message. It’s used to inspect the snapshot that’s about to be committed, to see if you’ve forgotten something, to make sure tests run, or to examine whatever you need to inspect in the code. Exiting non-zero from this hook aborts the commit, although you can bypass it withgit commit --no-verify
Scripting Languages
As long as the scripting language can be executed in the terminal on the system where the repository is located, it can be used to write Git hooks:
Shell scripts (e.g. bash, sh)
Python
Ruby
Perl
Node.js (JavaScript)
...
Bash
I based my pre-commit hook on the sample pre-commit.sample you find in the .git\hooks folder. In my script, I made use of a case statement: Using case statements (tldp.org) with string matching
The script
Build up
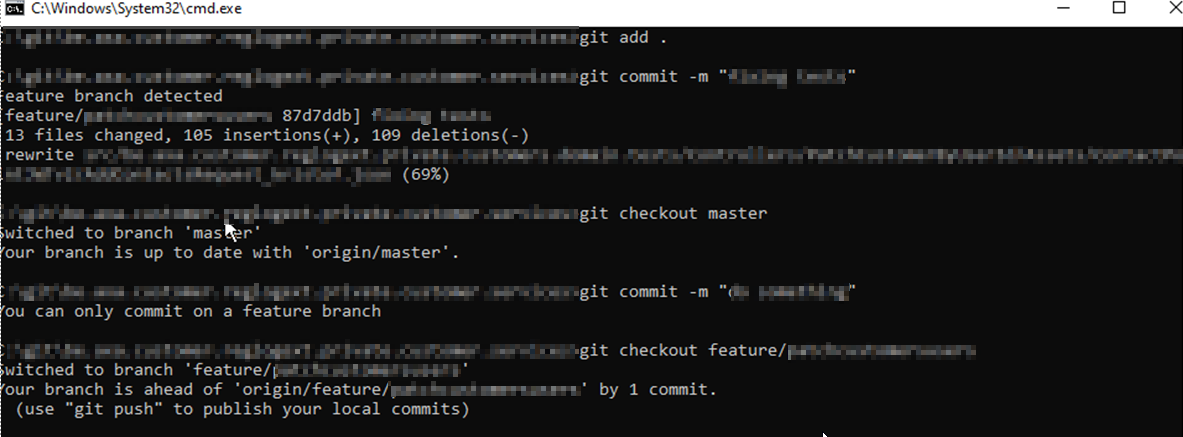
I use a git pre-commit hook to enforce myself to use a feature or bugfix branch on my repository. The code is merged into the master using a pull request on Azure DevOps.
Indicate what script language is used
#!/bin/shGetting the current branchname:
branch="$(git rev-parse --abbrev-ref HEAD)"String matching the branch name using a
casestatement. In thecasestatement, the string matching is performed using shell globbing patterns, not regular expressions.Shell globbing patterns ( not regex! ) are a way to match strings against a set of specified patterns in Unix-like systems, including the shell. They use wildcard characters (e.g.
*and?) to match multiple characters or a single character, respectively.case "$branch" in *feature/*) ;; *bugfix/*) ;; * ) ;; esacUse
exitcode 0for a successful exit andexitcode 1to indicate a failureexit 0 exit 1report to the end user with a message
 echo "Feature branch detected"
 echo "bugfix branch detected"
 echo "You can only commit on a feature branch"
Entire script
#!/bin/sh

branch="$(git rev-parse --abbrev-ref HEAD)"

case "$branch" in
*feature/*)
     echo "Feature branch detected"
     exit 0
     ;;
*bugfix/*)
     echo "bugfix branch detected"
     exit 0
     ;;
*         )
     echo "You can only commit on a feature branch"
     exit 1
     ;;
esac
In Action
Creating the script:
Using the script:
Outro
Branching etiquette refers to the conventions and best practices that developers should follow when working with Git branches. This can include things like naming conventions for branches, guidelines for when to create a new branch, and rules for when to merge branches into the main codebase.
Having a branching etiquette can help to keep the codebase organized and maintainable, which is essential for effective collaboration and efficient development. It also helps to ensure that the codebase is easy to understand and navigate, even as the number of branches and the size of the codebase grows.