How to read a claim from a token in DotNet 6?
Wait what? Claim? Token? Let us explore!

I am a backend developer from Belgium. My first language is C#. Mostly working on the .net tech stack. Powershell is the script language that I am most familiar with. I love automating stuff. Tools you work with should be tools that you like to work with :). Loving the devops scene as well. At the moment, my platform of choice is Azure, but looking at GitHub these days as well.
I do have some experience with typescript. but that is not my strongest suit.
Working with Rider and Resharper, so thanks Jetbrains for making great tools :)
Previously On
In my previous articles, I discussed the creation of a mocked OpenID Connect provider and the evolution of the HttpClient. Today, I want to discuss how user attributes (claims) are presented to the application using tokens.
Context
When I explored a codebase, I noticed that the access tokens and ID tokens are retrieved from the HttpRequest. This happened using custom code to access the headervalue of id_token and access_token. However, Asp.net core does give us the possibility to access those claims using HttpContext.User.Claims property.
In my code, I typically use the AddJwtBearer methods for backend services. When working on an MVC application, I tend to use the AddOpenIdConnect method. I find it a bit unclear when to use what. I want to clarify the differences between the two. It is not the scope of this article to state clearly the functional purpose of all the types of tokens.
Before we dive into the mechanics of accessing and utilizing claims, let's discuss what claims are and their purpose.
Claims
A claim represents a piece of information about a user. An example of a claim is a user's name, email address, and role,...
Tokens
A token is a string that serves as proof of identity or permission. Tokens are used to authenticate and authorize users.
Claims are stored in a token by e.g. Saml, Oauth2, OpenIdConnect or other authorization providers. The application will use the tokens for authentication and authorization purposes. The application is in Oauth2/OpenIdConnect jargon called a resource server. I will slightly mention 3 types of tokens: JWT, SAML and Opaque.
JWT (JSON Web Token):
JWT is a compact, URL-safe, and self-contained token format that consists of three base64-encoded parts separated by dots.
The three parts are the header, the payload, and the signature.
eyJhbGciOiJIUzI1NiIsInR5cCI6IkpXVCJ9.eyJzdWIiOiIxMjM0NTY3ODkwIiwibmFtZSI6IkpvaG4gRG9lIiwiaWF0IjoxNTE2MjM5MDIyfQ.SflKxwRJSMeKKF2QT4fwpMeJf36POk6yJV_adQssw5c
When decoded using jwt.ms, I get the following content
{
  "alg": "HS256",
  "typ": "JWT"
}.{
  "sub": "1234567890",
  "name": "John Doe",
  "iat": 1516239022
}.[Signature]
In this example, sub, name and iat are claims.
SAML (Security Assertion Markup Language) Token
SAML tokens are XML-based tokens used for exchanging authentication and authorization data between identity providers and service providers ( the application = resource server).
<Assertion xmlns="urn:oasis:names:tc:SAML:2.0:assertion" ID="_934873948nc4" IssueInstant="2022-03-01T12:34:56Z" Version="2.0">
  <Issuer>https://identityprovider.com</Issuer>
  <Subject>
    <NameID>1234567890</NameID>
    <SubjectConfirmation Method="urn:oasis:names:tc:SAML:2.0:cm:bearer">
      <SubjectConfirmationData NotOnOrAfter="2022-03-01T12:40:00Z" Recipient="https://serviceprovider.com" />
    </SubjectConfirmation>
  </Subject>
  <Conditions NotBefore="2022-03-01T12:34:56Z" NotOnOrAfter="2022-03-01T12:37:56Z">
    <AudienceRestriction>
      <Audience>https://serviceprovider.com</Audience>
    </AudienceRestriction>
  </Conditions>
  <AttributeStatement>
    <Attribute Name="email" NameFormat="urn:oasis:names:tc:SAML:2.0:attrname-format:unspecified">
      <AttributeValue>john.doe@example.com</AttributeValue>
    </Attribute>
    <Attribute Name="role" NameFormat="urn:oasis:names:tc:SAML:2.0:attrname-format:unspecified">
      <AttributeValue>User</AttributeValue>
    </Attribute>
  </AttributeStatement>
  <AuthnStatement AuthnInstant="2022-03-01T12:34:56Z">
    <AuthnContext>
      <AuthnContextClassRef>urn:oasis:names:tc:SAML:2.0:ac:classes:Password</AuthnContextClassRef>
    </AuthnContext>
  </AuthnStatement>
</Assertion>
```
In the example above, the creator of the token is https://identityprovider.com . The token is for the application ( = resource server ) called https://serviceprovider.com.
The tags Issuer and Subject, together with the attributes email and role are claims.
Opaque Token
An opaque token is a token that is not self-contained. That means the token does not contain readable information. I need the IDP server to know what claims this token represents. An opaque token is typically a long and random string with no useful information embedded within the token itself.
Here's an example of an opaque token:
JP67LLI73Y2DF3428IYV888PZFGTXZVH5H9S
In this example, due to the nature of an opaque token, there are no claims defined. To have that information, I need to make a call to an introspective endpoint.
Tokens purposes
OAuth2 has introduced the access_token and OpenIDConnect has introduced an id_token. The OpenIDConnect protocol is built on top of the OAuth2 protocol. When there is an OpenIDConnect server involved, the server can send an access_token and an id_token. It is important to know when to use what type of token. Most of the time but not always, an access_token can be decoded and the claims can be extracted. An id_token can always be decoded. An ID Token is always a JWT.
What if an access_token is an opaque token? The Oauth2 protocol defines an introspection endpoint. That allows the resource server to retrieve claims based on the supplied token. This is more secure. Everyone can decode a JWT token. It is not advisable to send over sensitive data using a JWT token.
Id Token
An ID token contains specific information about the user and is for authentication/authorization purposes.
E.g. Upon logging into the web application, the user is redirected to the identity provider for authentication (e.g. Google/Auth0/Microsoft). Once authenticated, the IdP generates an ID token, such as a JWT, containing the user's ID, name (e.g., John Doe), and email address (e.g., john.doe@example.com). The web application receives and validates the ID token. This means that we consider the user's identity is verified.
Access Token
An access token is primarily used to access protected resources. resources delivered by our resource server ( = application ). When the request has a valid access_token defined in the header, the application ( resource server) allows the request to be processed further in the pipeline.
E.g. After the user has successfully authenticated themselves and obtained the ID token, they want to place an order, which requires proper authorization. It is not because the application knows who you are, that you are allowed to place an order! The client application requests an access token from the identity provider. The identity provider verifies the user's credentials and checks their permissions. When the Idp provider can validate that the user may place an order, the Idp will issue an access token. What also can be, is that the IDP server will provide a token, but without mentioning the access_rights. The resource needs to be sure that all needed claims are there and valid, so that the user may place an order.
Middleware with Tokens and Claims
From here on, I will focus only on the JWT tokens and the OAuth2 and OpenIDConnect protocols.
Overview
To understand how claims are processed within an ASP.NET Core application, let's take a helicopter overview of the journey of an HTTP request. Read more about Middleware: ASP.NET Core Middleware | Microsoft Learn
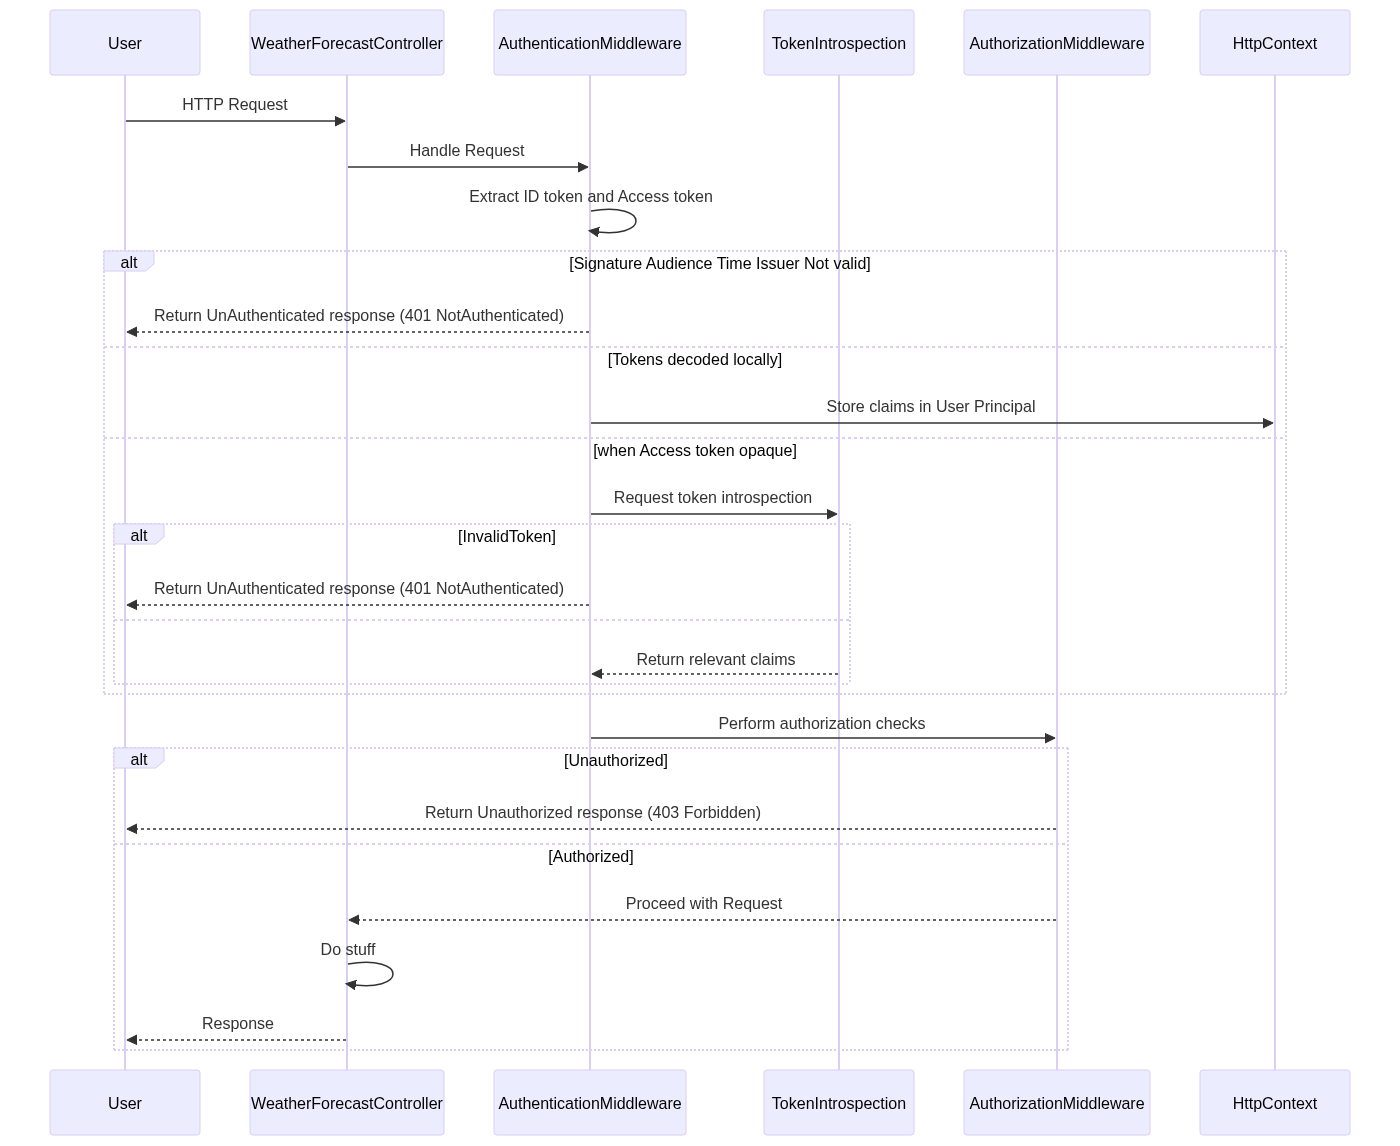
Imagine a scenario where you have a WeatherForecastController in your application. Upon receiving an HTTP request, the middleware pipeline kicks in and performs tasks, such as authentication and authorization. The middleware responsible for handling authentication will extract and validate the ID token and access token from the request's headers or cookies.
If the access token is opaque, meaning it cannot be decoded locally, the authentication middleware will need to communicate with the token introspection endpoint provided by the OpenID Connect provider to retrieve relevant claims.
Once the tokens have been validated and decoded, the claims are extracted and stored in the HttpContext's claims collection. These claims are then available throughout the request lifecycle.
It's important to note that if e.g. the audience, issuer, and time validity of the tokens don't match the expected values, then the middleware will discard the tokens. The action of the controller will not be called!
How to manipulate the Claims mapping process?
In some cases, I want to filter or map the claims received from the tokens to fit your domain-specific requirements or align with a different naming convention. ASP.NET Core provides a mechanism to achieve this.
Oauth2
Asp.net core does a lot for us. It is all about using the method AddAuthentication and AddJwtBearer when we just want to work with the OAuth2 protocol. Essentially it comes down to the following code.
//Program.cs

var builder = WebApplication.CreateBuilder(args);

builder.Services.AddAuthentication(JwtBearerDefaults.AuthenticationScheme)
        .AddJwtBearer(options =>
        {
            //Ensuring the token comes from the IDP we expect!
            options.Authority = "https://identityprovider.com";
            //Ensure the token we want to process is the one that is for us
            options.Audience = "https://api.myapp.com";
            options.TokenValidationParameters = new TokenValidationParameters
            {
                ValidateIssuer = true,
                ValidateAudience = true
                //...Other settings for validation of the token
            };
            Events = new JwtBearerEvents
            {
                OnTokenValidated = async ctx =>
                {
                    var claims = new List<Claim>
                    {
                        new Claim("ExtraClaim", "SomeValue")
                    };
                var extraIdentity = new ClaimsIdentity(claims);
                ctx.Principal.AddIdentity(extraIdentity );
                }
            }
        });
//...

IApp app = builder.Build();
    app.UseRouting();
    app.UseAuthentication(); // Enable authentication middleware
    app.UseAuthorization(); // Enable authorization middleware

    app.UseEndpoints(endpoints =>
    {
        endpoints.MapControllers();
    });
Read here for more information.
OpenID connect
OpenID Connect allows us to work differently. Unlike the AddJwtBearer method, we now have a ClaimsActions dictionary.
The ClaimActions dictionary is an option available when configuring the OpenID Connect authentication middleware using the AddOpenIdConnect() method. It allows me to customize the claim-handling behaviour of the middleware during the authentication process.
The ClaimActions dictionary provides a way to manipulate and control how the claims are mapped to the ClaimsIdentity in the authentication middleware. The dictionary maps the claim types to specific actions that should be performed on the claims during the mapping process. By using the ClaimActions.Clear(), the default mapping that Asp.net core does, will not occur.
Here is an example of setting up the ClaimActions dictionary:
services.AddAuthentication()
    .AddOpenIdConnect("OpenID", options =>
    {
        // Other configuration options
        //...
        //disable dotnet claimactions
        options.ClaimActions.Clear();

        //only map the claims I want!
        options.ClaimActions.MapUniqueJsonKey("role", "role");
        options.ClaimActions.MapUniqueJsonKey("sub", "userId");
        options.ClaimActions.MapUniqueJsonKey("email", "emailAddress");
        options.ClaimActions.MapUniqueJsonKey("custom_claim", "customClaimName");

        // Additional configuration
    });
AddJwtBearer or AddOpenIdConnect?
I can use the AddOpenIdConnect method instead of the AddJwtBearer method for validating access tokens and performing claims mapping.
The AddJwtBearer method is typically used when you have a separate authentication server that issues JWT tokens and you want to validate these tokens in my application. It is a lightweight middleware that focuses solely on token validation and does not perform any claims mapping or user information retrieval.
The AddOpenIdConnect method is used when you want to use OpenID Connect, which is an extension of OAuth 2.0 for authentication. It provides additional features like identity provider discovery, user authentication, claims-based authorization, and more. The AddOpenIdConnect middleware not only validates the tokens but also handles user information retrieval and claims mapping automatically.
ClaimsTransformation
For more advanced scenarios, I can implement a custom ClaimsTransformer. This allows me to intercept the claims before they are stored in the HttpContext and manipulate them as needed. This approach allows you to filter out unnecessary claims or transform their names to match your application's terminology.
In the following example, I want to parse the provider and userid from the sub-claim defined by the IdpProvider Auth0.
public class Auth0ProviderClaimsTransformation : IClaimsTransformation
{
    // Regular expression pattern to parse Auth0 user ID
    private readonly string auth0UserIdPattern = @"^(.*)\|(.*)$";

    public Task<ClaimsPrincipal> TransformAsync(ClaimsPrincipal principal)
    {
        var identity = (ClaimsIdentity)principal.Identity;

        // Get the sub claim (Auth0 user ID)
        var subClaim = identity.FindFirst("sub");

        if (subClaim != null)
        {
            // Extract provider and user ID from Auth0 user ID
            var matches = Regex.Match(subClaim.Value, auth0UserIdPattern);
            if (matches.Success)
            {
                var provider = matches.Groups[0].Value;;
                var userId = matches.Groups[1].Value;

                // Add provider and userId claims
                identity.AddClaim(new Claim("provider", provider));
                identity.AddClaim(new Claim("userid", userId));
            }
        }

        return Task.FromResult(principal);
    }
}
```
I have to register the class as a scoped service on the service collection and it works automagically.
builder.Services.AddTransient<IClaimsTransformation, Auth0ProviderClaimsTransformation >();
More on that here.
Accessing Claims in ASP.NET Core 6
When it comes to accessing claims in ASP.NET Core 6, I have several options depending on the context in which you need to utilize them. It comes down to tracking down where to access the HttpContext and use the User property. On the User property, I have access to the Claims property.
Authentication and Authorization Middleware
In the authentication middleware and authorization middleware, I can access claims directly from the HttpContext, ensuring that the necessary authentication and authorization checks are in place before proceeding.
AddJwtBearer method
I repeat the example used above but with a focus on where I can access the claims using the HttpContext. Read more about JwtBearerEvents here.
services.AddAuthentication(JwtBearerDefaults.AuthenticationScheme)
        .AddJwtBearer(options =>
        {
            // Configure JWT Bearer options
            // ...

            options.Events = new JwtBearerEvents
            {
                OnAuthenticationFailed = async context =>
                {
                    var httpContext = context.HttpContext;
                    // Access HttpContext
                    // ...

                    await Task.CompletedTask;
                },
                OnTokenValidated = async context =>
                {
                    var httpContext = context.HttpContext;
                    // Access HttpContext
                    // ...

                    await Task.CompletedTask;
                }
            };
        });
AddOpenIdConnect method
The same way of working with the AddJwtBearer method applies when working with the AddOpenIdConnect method.
services.AddAuthentication(options =>
{
    options.DefaultScheme = CookieAuthenticationDefaults.AuthenticationScheme;
    options.DefaultChallengeScheme = OpenIdConnectDefaults.AuthenticationScheme;
})
.AddCookie()
.AddOpenIdConnect(options =>
{
    // Configure OpenID Connect options
    // ...

    options.Events = new OpenIdConnectEvents
    {
        OnRedirectToIdentityProvider = async context =>
        {
            var httpContext = context.HttpContext;
            // Access HttpContext
            // ...

            await Task.CompletedTask;
        },
        OnTokenValidated = async context =>
        {
            var httpContext = context.HttpContext;
            // Access HttpContext
            // ...

            await Task.CompletedTask;
        }
    };
});
Controller
When working in a controller action or service layer, it is as easy to access the HttpContext.User property.
Why is it easy? Let me copy and paste the following code from this page from Microsoft Learn.
ClaimsPrincipal principal = HttpContext.User as ClaimsPrincipal;
if (null != principal)
{
   foreach (Claim claim in principal.Claims)
   {
      Console.WriteLine("CLAIM TYPE: " + claim.Type + "; CLAIM VALUE: " + claim.Value + "</br>");
   }
}
How would I access it in a controller then? Below you find some code that shows the access to the claim, using the HttpContext.User property. Read here for more information.
  [ApiController]
    [Route("[controller]")]
    public class WeatherForecastController : ControllerBase
    {
        private static readonly string[] Summaries = new[]
        {
            "Freezing", "Bracing", "Chilly", "Cool", "Mild", "Warm", "Balmy", "Hot", "Sweltering", "Scorching"
        };

        [HttpGet]
        [Authorize]
        public IEnumerable<WeatherForecast> Get()
        {
            var email = HttpContext.User.FindFirstValue(ClaimTypes.Email);

            if (email == null)
            {
                throw new Exception("Email claim not found.");
            }
I strongly recommend passing the claims as parameters or including them as part of a Data Transfer Object (DTO) when using a service in your controller. Do not use the IHttpContextAccessor in your domain or business logic layer. This ensures loose coupling between the service layer and the HttpContext. This allows for better testability and maintainability.
From my experience, all the tokens from the access_token and id_token are available. According to ChatGPT, the id_token should have precedence over the access_token when a claim is defined in both tokens but have a different value. I want to validate what it said, however, I do not find it in the sources on GitHub.
Other sources
I do like to mention the following sources that I may not explicitly mention in a link:
User claims in ASP.NET Core using OpenID Connect Authentication | Software Engineering (damienbod.com)
Introducing the OpenIddict client | Kévin Chalet's blog (kevinchalet.com)
Adding custom claims to a user during authentication with ASP.NET Core 2.0 - Joonas W's blog
aspnetcore/src/Components at main · dotnet/aspnetcore · GitHub
Outro
Claims play a good role in an application's authentication and authorization process and make the whole token process abstract for a dot net developer. Claims encapsulate user-specific information and are stored and transferred through tokens.
By understanding the tokens and claims, navigating the middleware pipeline, customizing claims, and accessing them securely, I can unlock claims-based authentication and authorization.
Shame about my research on the id_token and access_token. But maybe that is something for a later post.
Let us connect! What did you find about this post? What would like to read more about or less?